Threading a sewing machine can sound intimidating for an absolute rookie. But it is, in fact, a very uncomplicated process. Following the right steps can lead to fruitful and accurate stitches and with practice and experience, you will find that it is an absolute piece of cake.
Even though sewing machines can be of different types, most sewing machines look the same. Following the instruction manual is the best way to learn how to operate a sewing machine.
Knowing the architecture of the machine is vital. The top left of the machine has a tension disc close to the tension wheel and also the take-up lever — the top right consists of the spool pins and the bobbin winder.
The hand wheel is located on the far-left side of the machine while the stitch selector remains on the front lower right side. In some machines, the spool pin is on the back of the machine or near the bobbin winder on the side.
It is essential to carefully thread a sewing machine to achieve secure and faultless stitches.
Regardless of the different sizes and types of machines available, the threading mechanism is the same for them all: you have to make stitches by coupling the needing thread with the second thread popping out from the bobbin.
Setting Up the Sewing Machine
There are two ways a sewing machine can be set up: on a sewing cabinet or a sewing table.
A sewing table will without a doubt provide more facilities with additional storage space and drawers and will provide more breathing space, comfort, and room for sewers.
However, a sewing table can come in just as handy for those without compromising comfort. Furthermore, sewing tables are more portable and can be moved around with more ease.
A sewing table has the main compartment, which has an area for the sewing machine and one drawer. Some tables may have more space on the top for large samples, thread, cutting tools and containers for sewing equipment.
Setting Up the Machine on A Sewing Table
While the sewing cabinet comes with the benefits of easy installation where all you need to do is to place the machine on the cabinet, but setting up a sewing machine might take a little doing.
Before starting, you will need a few tools to prepare the table: screws, screwdriver, power drill, sewing machine with mounting holes and of course, the sewing machine itself.
Once the table is prepared, align the sewing machine with the table mounts by matching the screw holes in the sewing machine with the mounts on the table.
The mounts are in place on the table, and the attachment holes of the machine are usually on the bottom of the machine.
It is essential to ensure the table mount is aligned with the sewing machine.
The machine and the table are usually aligned, but if not, there can be two ways in which they can be aligned: if additional holes are drill on the table, you need to put the mounting hardware in the holes to synchronize with the holes in the machine.
However, if the additional mounting holes are absent, they have to be drill using a power drill.And finally, the sewing table mount will be placed and can be raised and lowered by screwing the mounting hardware to the table by using screws and bolts.
A Few Steps and Limitations
- First things first, make sure the table is suitable regarding dimensions and weight for the machine that will inhabit it before buying it. Most table specifications usually name the machines they are compatible with.
- Make sure to know if the mounting hardware (screws, bolts, etc.) are included in the package of the table. If not, do not forget to purchase them as they are necessities.
- When putting the placing the machine on the table, make sure to have a helping hand. Someone needs to hold the machine while the other attaches the hinges.
- Check the machine to see if there are holes for screws at the back. If not, the machine cannot be attached to a table.
Some Limitations with Cabinets
- Portable machines are not compatible with cabinets.
- Newer, more modern sewing machines should only be set up on air-life cabinets as you will not require to further bolt the machine in place. The machine will sit comfortably on the lifting platform.
The Steps of Threading a Sewing Machine
Step 1:
Make sure your machine is turned off (if it is electric) first. Unplug it and remove all connections.
Step 2:
Now, ensure the presser foot is in an upward position and feed a spool of thread onto the spool holder. Try to find a thread guide by following the spool holder across the top of the machine and feed the thread in the thread guide.
Step 3:
Spotting a tension mechanism, pull a spool of thread towards the tension mechanism and slip the thread in the middle of the of the metal disks of that and then push the thread back upwards.
Step 4:
Now look for an area on the front of the machine which moves up and down when turning the hand wheel. This is called the take-up mechanism.
Feed the thread through the take-up lever, and it will go downwards on the left side of the lever (while some machines allow the thread to slide into the take-up lever, for others you will have to place the thread through a hole).
Step 5:
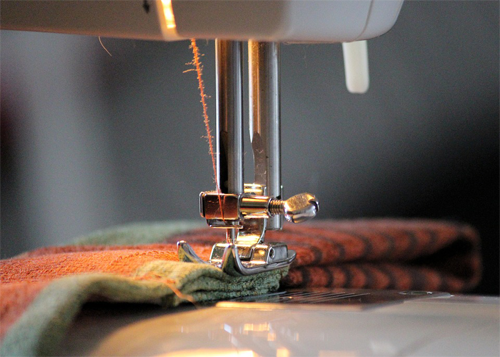
Find and thread the thread guides all the way down to the needle of the sewing machine.
Step 6:
This is the part where you thread the needle. The most effective way to do this is to hold the thread with your left hand and turning the hand wheel with your right hand.
Step 7:
Look out for any thread flapping and waving around. This would suggest that you have missed a thread guide.
Some Useful Tips
Here are a few extra tips to become an expert in sewing:
1. Practice: Test your machine by practicing on samples or scraps and try to thread a sample first. Start sewing slowly to test the machine’s performance.
2. Quality: Use good quality thread to ensure excess lint is not deposited in the machine.
3. Test the Tension: In certain cases, the tension needs adjustments. This can be figured out if the stitching is found to be uneven.
4. Maintenance: Regularly maintain the machine by cleaning and oiling it before running.
5. Regular Replacement: Regularly replace the needle of the sewing machine to ensure optimum results.
6. Start Slow: If you are a beginner, start with simpler projects on relatively easier to operate machines and slowly move to more complicated work. This will help you master the sewing machine and understand the machine better.
How to thread a sewing machine: Final thoughts
Give this article a good read, jot down all the equipment you’ll need and go through the steps, and voila, you’ll have your first sample ready in no time.
The first few times may seem challenging, but as they say, practice makes perfect, and experience makes you better. Happy sewing!
so helpful it must be 35years since I last used a sewing machine .
So glad it was helpful! Thanks for the comment!!